The first time I prepared costilla de res for my extended family, I was terrified. These magnificent beef ribs—with their generous marbling and impressive size—represented not just dinner but a cultural touchpoint that connected generations. As the savory aroma of slow-roasting beef began wafting through the house, something magical happened. Conversations grew warmer, memories flowed more freely, and even before the first bite, I witnessed how this humble cut of meat could transform an ordinary gathering into something extraordinary.
Whether you’re cooking for family, friends, or simply treating yourself, mastering costilla de res is a culinary skill worth acquiring. These Mexican-style beef ribs, when prepared correctly, deliver an unmatched depth of flavor and tenderness that will have everyone at your table reaching for seconds. The best part? You don’t need professional equipment or years of culinary training—just your oven, a few simple ingredients, and the patience to let this remarkable cut work its magic.
Throughout this guide, you’ll discover a foolproof method broken down into five straightforward steps that guarantee mouth-watering results every time. Let’s embark on this flavorful journey together, transforming raw beef ribs into a masterpiece of taste and texture that honors this cherished tradition.
What Makes Costilla de Res Special Among Beef Cuts
Before diving into the cooking process, understanding what makes costilla de res unique will help you appreciate why this cut deserves special treatment. Costilla de res refers to beef ribs, typically from the plate section of the cow (the lower portion of the rib cage). Unlike their pork counterparts, beef ribs boast substantial meat between and atop the bones, with stunning marbling throughout.
The extraordinary fat distribution within costilla de res serves a crucial purpose during cooking. As these ribs slowly roast, the fat gradually renders, basting the meat naturally and creating an environment where tough connective tissues can break down into rich gelatin. This transformation is what gives properly cooked costilla de res its signature melt-in-your-mouth quality.
Nutritionally speaking, beef ribs provide an excellent source of protein, iron, zinc, and B vitamins. While they do contain fat, much of it renders during the cooking process. The remaining fat contributes to flavor satiety, often leaving you satisfied with a smaller portion than you might expect.
Oven-baking stands out as the ideal method for preparing costilla de res in home kitchens because it creates a controlled environment where temperature remains consistent. This steady heat allows the ribs to cook evenly and slowly—the secret to transforming this potentially tough cut into something remarkably tender and flavorful without specialized equipment.
Essential Preparation Steps
Gathering Your Ingredients and Tools
Success begins with quality ingredients. For truly memorable costilla de res, prioritize freshness and quality over quantity.
| Ingredient | Quantity | Notes |
|---|---|---|
| Beef ribs (costilla de res) | 3-4 pounds | Ask your butcher for meaty ribs with good marbling |
| Salt | 2 tablespoons | Kosher or sea salt preferred for better adhesion |
| Black pepper | 1 tablespoon | Freshly ground delivers superior flavor |
| Garlic powder | 2 teaspoons | Provides consistent flavor throughout |
| Cumin | 1 teaspoon | Ground for easier distribution |
| Dried oregano | 1 teaspoon | Mexican oregano offers authenticity if available |
| Bay leaves | 2-3 leaves | Adds subtle depth to the cooking liquid |
| Olive oil | 2 tablespoons | Helps seasonings adhere to meat surface |
| Onion | 1 large | Roughly chopped for the aromatic base |
| Garlic | 4 cloves | Minced to release maximum flavor |
| Tomatoes | 2 medium | Diced for acidity and moisture |
| Beef broth | 1 cup | Low sodium allows better flavor control |
| Optional: chile peppers | 1-2 | Adjust according to personal heat preference |
Equipment Needed for Perfect Oven-Baked Costilla de Res
While costilla de res doesn’t demand specialized equipment, having the right tools makes the cooking process significantly more manageable:
- Deep roasting pan or Dutch oven (with lid if possible)
- Heavy-duty aluminum foil
- Reliable meat thermometer
- Kitchen tongs for handling hot ribs
- Sharp knife for trimming and serving
- Sturdy cutting board that won’t slip
- Measuring spoons and cups for precision
The right equipment ensures you can focus on technique rather than wrestling with inadequate tools. Particularly important is a roasting vessel deep enough to accommodate both the ribs and cooking liquid without overcrowding, which would lead to steaming rather than proper braising.
5 Easy Steps to Delicious Oven-Baked Costilla de Res
Step 1: Preparing the Costilla de Res
Begin by examining your ribs. Unlike some cuts where removing all fat is desirable, costilla de res benefits from retaining some fat. Trim only excessive fat (anything thicker than ¼ inch) while leaving the marbled portions intact. This balanced approach ensures flavor development while preventing the final dish from becoming greasy.
Next, create your seasoning blend by combining salt, pepper, garlic powder, cumin, and oregano in a small bowl. Mix thoroughly to distribute the spices evenly. Before applying the seasoning, pat the ribs dry with paper towels—this crucial step ensures the seasonings adhere properly rather than simply dissolving in surface moisture.
Drizzle olive oil over the ribs, using your hands to massage it across all surfaces. This thin coating serves as “glue” for your spice blend. Apply your seasoning mixture generously, paying particular attention to the meatiest sections. Work the seasonings into every crevice, ensuring no area remains untouched by flavor.
Allow the seasoned ribs to rest at room temperature for 30-45 minutes. This tempering process permits the meat to warm slightly, promoting more even cooking and allowing the salt in your seasoning to penetrate deeper into the meat, enhancing flavor beyond the surface.
Step 2: Creating the Perfect Cooking Environment
Preheat your oven to 275°F (135°C). This relatively low temperature represents the sweet spot for costilla de res, allowing sufficient heat for rendering fat and softening connective tissue without drying out the meat. Patience during this slow-cooking process rewards you with exceptional tenderness.
While your oven preheats, prepare the roasting pan by creating an aromatic foundation. Spread chopped onions, minced garlic, and diced tomatoes across the bottom of your pan. These ingredients will release moisture and flavor during cooking, contributing to the development of a rich sauce and preventing the meat from drying out.
Pour beef broth into the pan, adding just enough liquid to cover the vegetable mixture without submerging the ribs. This careful balance creates the perfect braising environment—the ribs cook through a combination of moist heat from below and dry heat from above, developing both tenderness and concentrated flavor.
Step 3: Arranging and Covering the Ribs
Place your seasoned costilla de res in the prepared roasting pan, arranging them bone-side down atop the aromatic mixture. If possible, position the ribs in a single layer with minimal overlap to ensure even cooking. Should you need to stack them slightly, ensure you rotate their positions halfway through cooking.
Cover the pan tightly with heavy-duty aluminum foil, crimping the edges firmly against the pan’s rim to create a proper seal. This seal traps moisture and heat, creating a self-basting environment essential for developing tenderness. If using a Dutch oven with a fitting lid, this provides an excellent alternative to foil.
The importance of a proper seal cannot be overstated—it prevents moisture from escaping too rapidly, maintaining the humid cooking environment needed for breaking down collagen in the ribs. An inadequate seal leads to dry, tough results, regardless of how long you cook them.
Step 4: The Slow-Cooking Process
Place your covered roasting pan in the preheated oven and prepare for patience. Costilla de res typically requires 3-4 hours of cooking time, depending on the thickness of the meat and your desired level of tenderness. This extended cooking period allows sufficient time for collagen to transform into gelatin—the secret behind truly succulent ribs.
Avoid the temptation to frequently open the oven or uncover the pan to check progress, as each peek releases accumulated heat and moisture, extending cooking time and potentially drying out your ribs. Instead, wait until at least the 2.5-hour mark before making your first check.
When checking for doneness, look for these indicators: meat pulling back from the bone ends, a fork or knife meeting little resistance when inserted, and an internal temperature reaching approximately 195-203°F (90-95°C) for optimal tenderness. If using a thermometer, insert it into the meatiest portion without touching bone for an accurate reading.
For additional browning and flavor concentration, remove the foil during the final 20-30 minutes of cooking. This optional step allows the surface to caramelize slightly, adding visual appeal and enhancing flavor complexity.
Step 5: Finishing and Serving
Once your costilla de res reaches perfect tenderness, remove the pan from the oven but resist the urge to serve immediately. Instead, allow the ribs to rest for 15-20 minutes, tented loosely with foil. During this resting period, internal juices redistribute throughout the meat rather than rushing out when cut, resulting in moister, more flavorful bites.
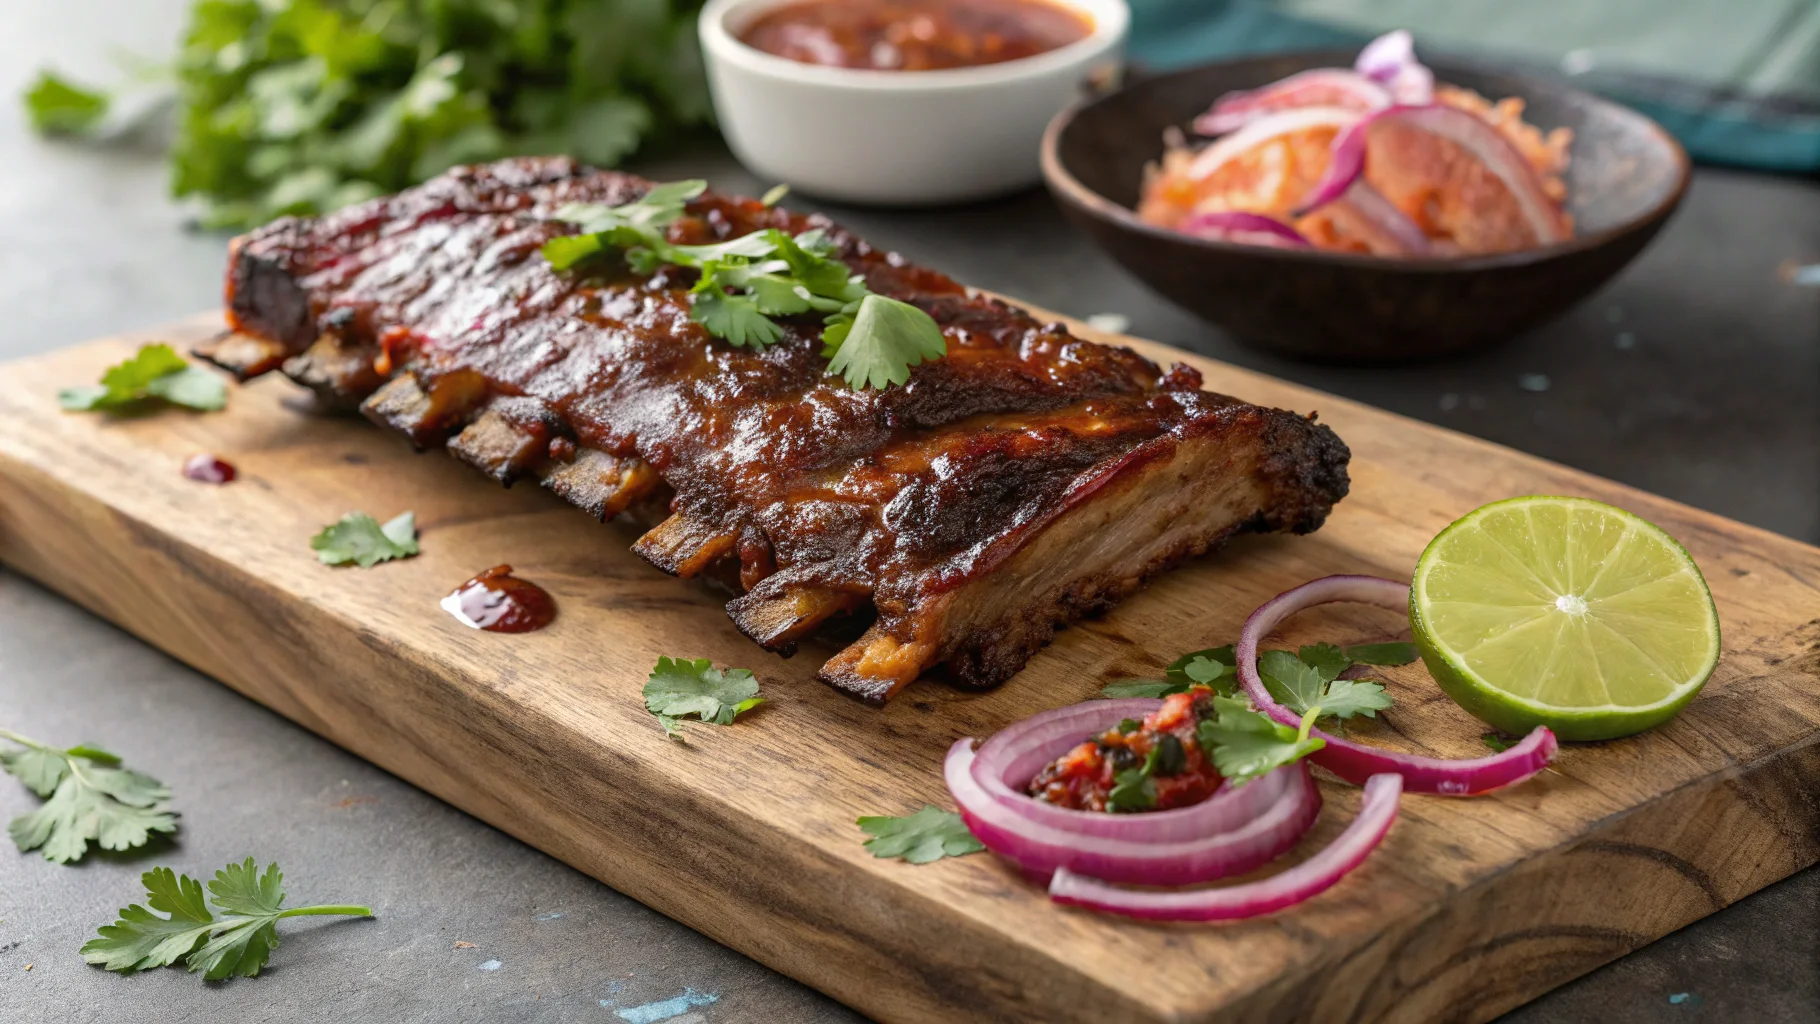
For traditional presentation, separate individual ribs by cutting between the bones using a sharp knife. Alternatively, for larger portions, cut sections containing 2-3 ribs. Transfer to a serving platter, spooning some of the pan juices and softened aromatics over the meat for additional flavor.
Garnish with fresh cilantro and lime wedges just before serving to add brightness that complements the rich, savory profile of the beef. This final touch balances the dish’s richness while adding visual appeal.
Delicious Flavor Variations for Your Costilla de Res
Traditional Mexican-Style Costilla de Res
For a more authentic Mexican approach, add dried guajillo or ancho chiles (stems and seeds removed) to your braising liquid, along with a cinnamon stick and 2-3 whole cloves. These additions create a deeper, more complex flavor profile reminiscent of regional specialties.
Additionally, consider incorporating cumin seeds (lightly toasted and ground) rather than pre-ground cumin, and substituting Mexican chocolate (1 ounce, finely chopped) for an element of traditional mole flavor that pairs remarkably well with beef.
BBQ-Inspired Oven Costilla de Res
Create a simple yet effective BBQ-inspired experience by preparing a sauce combining 1 cup tomato sauce, 3 tablespoons brown sugar, 2 tablespoons apple cider vinegar, 1 tablespoon Worcestershire sauce, and 1 teaspoon each of paprika, garlic powder, and onion powder.
Apply this sauce during the final 30 minutes of cooking after removing the foil cover. Baste every 10 minutes to build up luscious layers of flavor that mimic outdoor barbecue results without requiring specialized equipment.
Spicy Costilla de Res with Chiles
For heat enthusiasts, incorporate fresh jalapeños, serranos, or even habaneros (depending on your tolerance) into your aromatics base. For more controlled spiciness, start with one pepper, seeds removed and finely diced, then adjust in future preparations according to preference.
Alternatively, create a chile paste by rehydrating dried chiles in hot water, then blending them with garlic, a splash of vinegar, and a pinch of salt. This paste can be rubbed directly onto the meat before cooking for heat that permeates throughout rather than concentrating in the sauce.
What to Serve with Your Oven-Baked Costilla de Res
Complete your costilla de res experience with complementary sides that balance the richness of the beef while celebrating traditional flavors:
- Mexican rice with its tomato-infused flavor provides perfect contrast
- Refried beans offer creamy texture and additional protein
- Warm corn or flour tortillas create opportunities for delicious tacos
- Fresh guacamole contributes cooling creaminess
- Pico de gallo adds bright, acidic notes that cut through richness
- Grilled vegetables like zucchini, bell peppers, and onions provide color and nutrition
- Lime wedges for tableside squeezing offer customizable brightness
For a complete dining experience, consider offering cold Mexican beer, horchata, or a simple agua fresca to accompany this hearty dish.
Avoiding Common Mistakes When Cooking Costilla de Res
Dealing with Tough Ribs
If your costilla de res remains tough after expected cooking time, several factors may be responsible. Most commonly, insufficient cooking time is the culprit—different cuts and thicknesses require variable durations. The solution is straightforward: return them to the oven, well-covered, checking every 30 minutes until they reach desired tenderness.
Another potential issue involves cooking temperature. If your oven runs hot, the outside might appear done while the interior remains tough. Using an oven thermometer ensures accuracy, while reducing temperature by 25°F can resolve this problem in future preparations.
Preventing Dry Costilla de Res
Moisture management proves critical for juicy results. Always ensure your braising liquid remains throughout cooking—check midway and add additional warm beef broth if levels appear low. Additionally, confirm your foil seal remains intact throughout cooking.
Recognize that perfectly cooked costilla de res should maintain some structural integrity while yielding easily to gentle pressure. When meat falls completely off the bone with no resistance whatsoever, it has likely crossed into overcooked territory, losing moisture and developing a stringy texture.
Making the Most of Leftover Costilla de Res
Proper Storage Methods
Refrigerate leftover costilla de res within two hours of serving. Place portions in shallow, airtight containers and store in the refrigerator for up to 3-4 days. For optimal freshness, include some of the cooking liquid with the meat to prevent drying during storage.
For longer preservation, freeze thoroughly cooled ribs in heavy-duty freezer bags or airtight containers for up to 3 months. Remove as much air as possible before sealing, and label with the date. Consider portioning before freezing for easier future use.
Reheating Without Drying Out
Restore refrigerated costilla de res to its former glory by reheating in a 300°F oven. Place ribs in a baking dish with a splash of beef broth or reserved cooking liquid, cover tightly with foil, and heat for 15-20 minutes until warmed throughout.
For microwave reheating, place ribs in a microwave-safe dish with a tablespoon of liquid and cover with a damp paper towel. Heat on medium power in 30-second intervals, rearranging between cycles for even warming without overheating edges.
Alternatively, shred leftover meat and incorporate it into tacos, enchiladas, or quesadillas for delicious transformation that requires minimal reheating.
Enjoying Your Perfectly Cooked Costilla de Res
Mastering costilla de res requires patience more than specialized skill. The magic happens during those long, slow hours in the oven when tough fibers surrender their resistance and transform into something truly extraordinary. While the process demands time, your active involvement remains minimal—perfect for busy households where tending a stove continuously isn’t practical.
Remember that each preparation offers learning opportunities. Perhaps your first attempt might benefit from additional seasoning, or maybe you’ll discover your oven’s particular temperament requires slight temperature adjustment. Embrace these discoveries as part of your culinary journey.
The true reward comes when you bring these magnificent ribs to the table and witness the reaction of those fortunate enough to share them. There’s something profoundly satisfying about transforming a humble cut into a centerpiece worthy of celebration, carrying forward traditions that have brought people together for generations.
We’d love to hear about your costilla de res adventures! Share your cooking experiences, personal variations, or family traditions in the comments below. Your insights might inspire fellow cooks to try something new or solve a challenge they’ve encountered.
Frequently Asked Questions About Cooking Costilla de Res in the Oven
How long should I cook costilla de res in the oven for the most tender results?
For supremely tender costilla de res, plan on 3-4 hours at 275°F. Thicker, meatier ribs typically require the full 4 hours, while lighter cuts might reach perfection closer to the 3-hour mark. Rather than focusing exclusively on time, use tenderness as your primary indicator—properly cooked costilla de res should yield easily when probed with a fork but still maintain structural integrity.
Can I prepare costilla de res ahead of time?
Absolutely! Costilla de res actually benefits from advance preparation. Season the ribs up to 24 hours before cooking and store them covered in the refrigerator, allowing flavors to penetrate more deeply. Alternatively, complete the entire cooking process a day ahead, refrigerate, and reheat covered at 300°F for 20-30 minutes before serving. Many enthusiasts find the flavor improves after a day of rest as the seasonings continue developing.
What’s the difference between beef back ribs and costilla de res?
While both are beef ribs, costilla de res typically refers to plate ribs (shorter ribs from the lower portion of the rib cage), which have more meat and fat between the bones. Beef back ribs come from nearer the spine and often have meat primarily on top of the bones. Cooking techniques remain similar, though back ribs might require slightly less time due to their different meat distribution. Either can be delicious when properly prepared!
How do I know when my costilla de res is perfectly cooked?
Perfect costilla de res exhibits several telltale signs: meat pulls back from the bone ends by approximately ¼-½ inch; a fork inserted into the meatiest portion meets little resistance; when lifted with tongs, the ribs flex without breaking apart; and an internal temperature reaches 195-203°F in the thickest section. Visual cues include a slightly darkened exterior and noticeable rendering of fat throughout.
Can I cook costilla de res in a slow cooker instead of the oven?
Yes! Slow cookers work wonderfully for costilla de res. Prepare the ribs exactly as described for oven cooking, then arrange them in your slow cooker atop similar aromatics. Cook on low for 7-8 hours or high for 4-5 hours until tender. For the caramelized exterior, transfer to a baking sheet and broil briefly before serving. While convenient, slow cookers sometimes produce slightly less concentrated flavors than oven methods.
What are the best spices to use for authentic costilla de res flavor?
Traditional Mexican costilla de res typically features cumin, Mexican oregano, garlic, and various dried chiles as foundational flavors. Consider incorporating achiote paste or powder for earthy notes and beautiful color. Additional authentic options include cinnamon, cloves, and allspice in small quantities. Experiment with these elements to discover your preferred authentic flavor profile.
How can I make my costilla de res more tender?
For maximum tenderness, focus on four key factors: temperature (keep it low, around 275°F), moisture (ensure adequate braising liquid throughout cooking), time (don’t rush the process), and proper sealing (maintain a tight foil cover). Additionally, consider marinating ribs overnight in a mixture containing either pineapple juice or cola—both contain natural enzymes that help break down tough proteins.
What’s the best way to reheat leftover costilla de res without drying it out?
Preserve the juicy texture of leftover costilla de res by reheating in a 300°F oven in a covered dish with added moisture (broth or reserved cooking liquid). For quicker results without sacrificing quality, consider gently steaming the ribs over simmering water for 5-7 minutes until heated through. Avoid high-heat methods like broiling or high-power microwaving, which rapidly deplete remaining moisture.
Give these techniques a try, and transform ordinary beef ribs into an extraordinary culinary experience that will have everyone requesting your costilla de res recipe. We’d love to hear how these methods work for you—share your results and any personal variations in the comments below!
