Picture this: It’s Sunday evening, and your family gathers around the dinner table, their eyes lighting up as you present a beautifully golden, perfectly cooked strip loin roast. The aroma fills the room, and with the first bite, you hear that satisfying “mmm” that every home cook dreams of. If you’ve ever felt intimidated by cooking premium cuts of beef, worried about wasting an expensive piece of meat, or simply wanted to elevate your Sunday dinner game, you’re in the right place. Today, I’ll share the exact 5-step method that transforms anyone into a strip loin roast master, ensuring juicy, tender results every single time.
What Makes Strip Loin Roast Special?
Strip loin roast comes from the short loin section of the cow, the same area that gives us New York strip steaks. This premium cut offers an exceptional balance of tenderness and robust beef flavor, making it ideal for special occasions or when you want to impress your guests.
Unlike other premium roasts, strip loin provides consistent marbling throughout, which translates to even cooking and superior taste. When you compare it to ribeye roast, strip loin offers a leaner profile while maintaining incredible flavor. Against tenderloin, it delivers more pronounced beef taste at a fraction of the cost.
Your typical strip loin roast weighs between 4 to 8 pounds, making it perfect for feeding 6 to 12 people. The natural fat cap on top bastes the meat during cooking, while the moderate marbling ensures each slice remains succulent.
Essential Equipment and Ingredients
Before diving into the cooking process, gather these crucial tools and ingredients. Having everything prepared beforehand prevents costly mistakes and ensures smooth execution.
Must-Have Kitchen Tools
Your success depends on having the right equipment:
- Instant-read meat thermometer: Non-negotiable for achieving perfect doneness
- Roasting pan with rack: Promotes even air circulation
- Sharp carving knife: Essential for clean, professional-looking slices
- Kitchen twine: Helps maintain uniform shape during cooking
Strip Loin Roast Ingredients

| Ingredient | Quantity | Purpose |
|---|---|---|
| Strip Loin Roast | 4-6 lbs | Main protein |
| Kosher Salt | 2-3 tbsp | Seasoning & moisture retention |
| Black Pepper | 1-2 tbsp | Flavor enhancement |
| Garlic Powder | 1 tbsp | Aromatic base |
| Fresh Rosemary | 2-3 sprigs | Herb infusion |
| Olive Oil | 2 tbsp | Searing & browning |
| Butter | 4 tbsp | Basting & richness |
How to Cook Strip Loin Roast Perfectly: The 5-Step Method
Step 1: Proper Preparation and Seasoning
Remove your roast from refrigeration 45 minutes before cooking. This crucial step allows the meat to reach room temperature, promoting even cooking throughout. Cold meat placed directly in the oven often results in an overcooked exterior and undercooked center.
Pat the roast completely dry using paper towels. Moisture on the surface prevents proper browning and creates steam instead of the desired caramelized crust. Trim any excess fat, leaving approximately ¼ inch of fat cap to provide natural basting during cooking.
Season generously with kosher salt, freshly ground black pepper, and garlic powder. Apply seasoning to all surfaces, pressing gently to ensure adherence. For enhanced flavor, you can season the roast 24 hours in advance and refrigerate uncovered, allowing the salt to penetrate deeper into the meat.
If your roast appears uneven in thickness, tie it with kitchen twine at 2-inch intervals. This technique ensures uniform cooking and professional presentation.
Step 2: High-Heat Searing for Perfect Crust
Preheat your oven to 450°F while heating an oven-safe skillet or roasting pan on the stovetop over medium-high heat. Add olive oil and wait until it shimmers, indicating optimal searing temperature.
Place the seasoned roast in the hot pan and sear for 3-4 minutes per side. You’ll hear an immediate sizzle – this sound indicates proper temperature for Maillard reaction, the chemical process responsible for developing complex flavors and appealing color.
Resist the urge to move the roast during searing. Allow each surface to develop a rich, golden-brown crust before rotating. This caramelization creates hundreds of flavor compounds that elevate your final dish.
Step 3: Controlled Oven Roasting
After achieving proper searing on all sides, reduce your oven temperature to 325°F. This lower temperature allows for gentle, even cooking that preserves moisture while developing tenderness.
Transfer the seared roast to your roasting rack, positioning it fat-side up. The natural fat cap will slowly render, continuously basting the meat below. Add fresh rosemary sprigs around the roast for aromatic enhancement.
Calculate cooking time using this formula: 15-20 minutes per pound for medium-rare doneness. However, never rely solely on time – internal temperature provides the most accurate doneness indicator.
Step 4: Temperature Monitoring and Basting
Insert your meat thermometer into the thickest part of the roast, avoiding contact with fat or bone. Monitor these target temperatures:
- Rare: 120-125°F
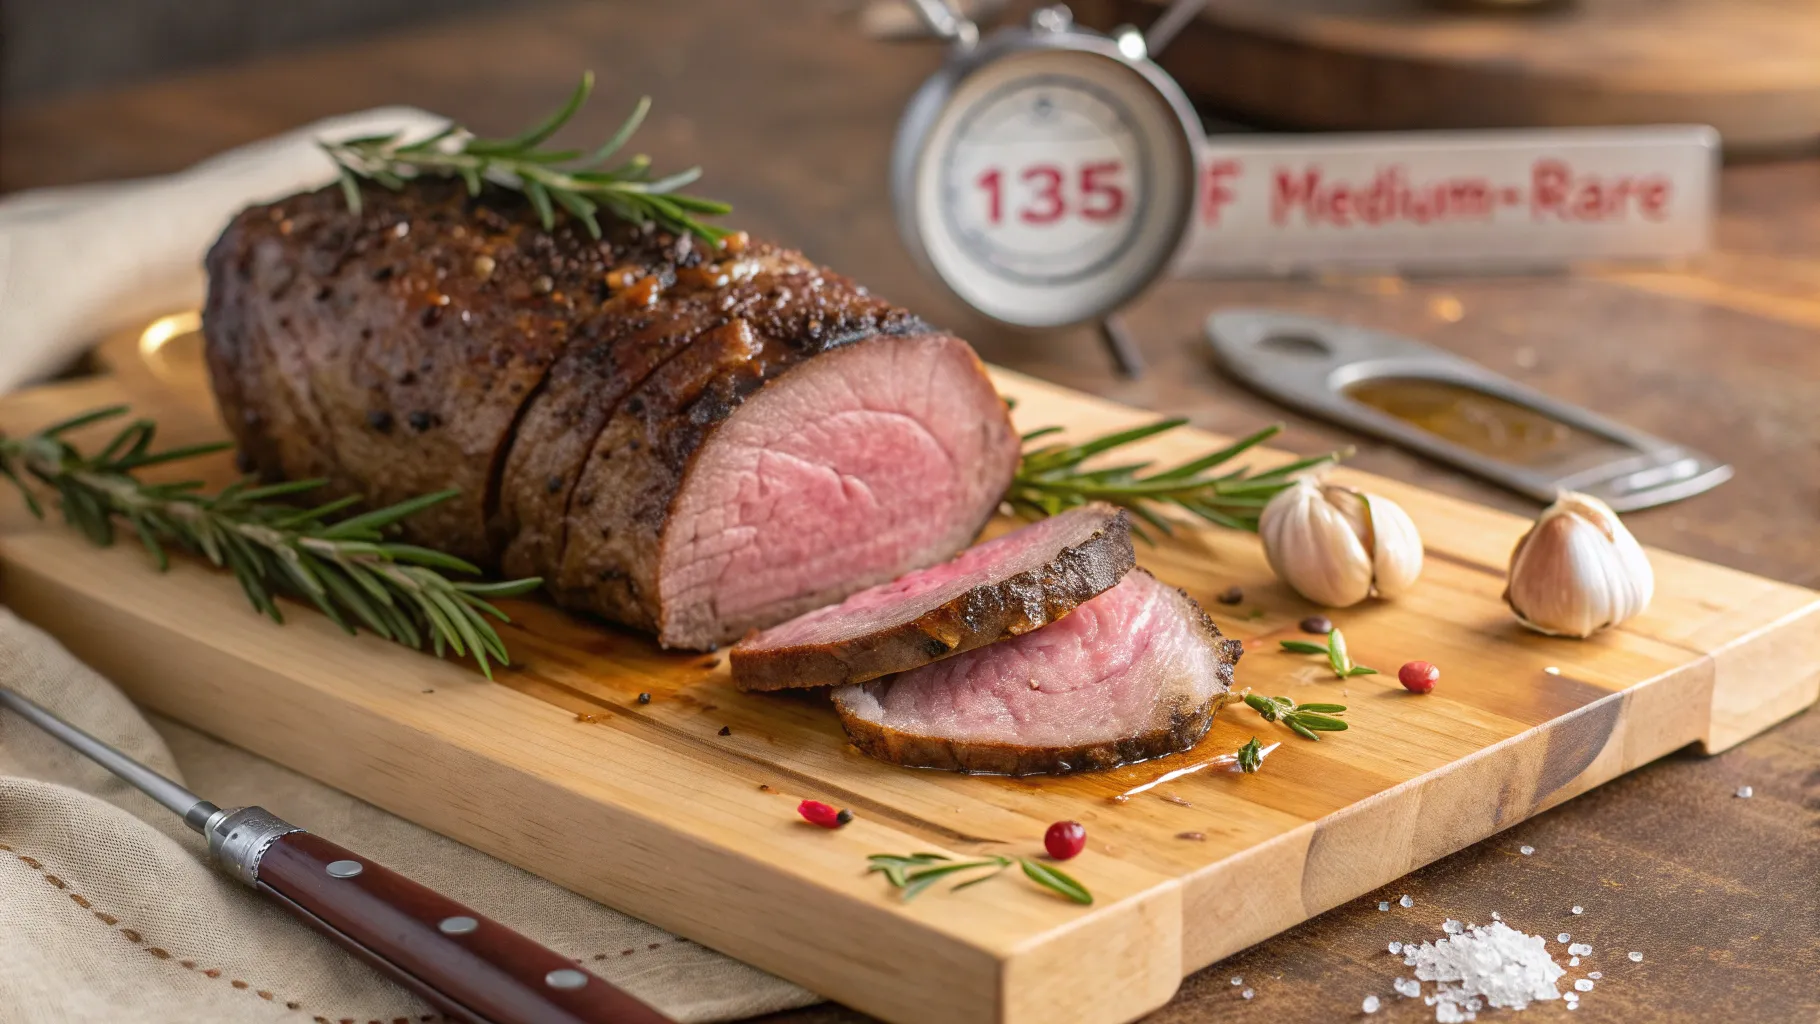
- Medium-rare: 130-135°F (recommended)
- Medium: 140-145°F
- Medium-well: 150-155°F
Every 20 minutes, baste the roast with melted butter mixed with pan juices. This process adds richness while promoting even browning. Avoid opening the oven door excessively, as temperature fluctuations extend cooking time and affect results.
Watch for visual cues alongside temperature readings. The exterior should develop a deep mahogany color, and the meat should feel firm yet springy when pressed gently.
Step 5: Resting and Expert Carving
Once your thermometer reads 5 degrees below your target temperature, remove the roast from the oven. Internal temperature will continue rising during the resting period, reaching perfect doneness.
Tent the roast loosely with aluminum foil and let it rest for 15-20 minutes. This critical step allows juices to redistribute throughout the meat, preventing them from running out when carved.
During resting, prepare your carving station. Use a large cutting board with grooves to catch juices, and ensure your knife is sharp for clean cuts.
Remove the kitchen twine and position the roast with the grain running left to right. Slice against the grain in ½-inch thick portions. This cutting technique breaks up muscle fibers, resulting in more tender bites.
Pro Tips for Strip Loin Roast Success
Common Mistakes to Avoid
Your success depends on avoiding these frequent errors:
Temperature Missteps: Never skip bringing the roast to room temperature. Cold meat cooks unevenly, resulting in disappointing texture contrasts.
Inadequate Searing: Rushing the searing process compromises flavor development. Take time to achieve proper browning on all surfaces.
Premature Cutting: Cutting immediately after cooking causes precious juices to escape, leaving you with dry meat despite perfect cooking.
Overcrowding: Avoid placing vegetables directly around the roast during cooking, as they release moisture and prevent proper browning.
Advanced Techniques
For even more impressive results, consider these professional approaches:
Reverse Searing Method: Start at 275°F until the internal temperature reaches 115°F, then finish with high-heat searing for exceptional crust development.
Herb Butter Finishing: Create compound butter with fresh herbs, garlic, and lemon zest. Place pats on the resting roast for additional richness.
Pan Sauce Creation: Deglaze your roasting pan with red wine, scraping up browned bits to create an elegant sauce.
Frequently Asked Questions About How to Cook Strip Loin Roast Perfectly
How long does it take to cook strip loin roast perfectly? Cooking time varies based on weight and desired doneness. Plan for 15-20 minutes per pound at 325°F after initial searing. A 5-pound roast typically requires 75-100 minutes total cooking time.
What temperature should I cook strip loin roast to for perfect results? For optimal results, target 130-135°F internal temperature for medium-rare doneness. Remember that temperature increases 5-10 degrees during resting, so remove the roast slightly before reaching your final target.
Can I cook strip loin roast perfectly without a meat thermometer? While experienced cooks can judge doneness through touch and visual cues, using a meat thermometer ensures consistent results, especially when working with expensive cuts.
Should I cover strip loin roast while cooking it perfectly? Never cover the roast during cooking, as this creates steam and prevents proper browning. Only tent with foil during the resting period to retain heat.
Serving Your Masterpiece
Your perfectly cooked strip loin roast pairs beautifully with classic accompaniments. Consider roasted root vegetables, creamy mashed potatoes, or fresh green beans. For beverages, full-bodied red wines like Cabernet Sauvignon or Malbec complement the rich beef flavors excellently.
Present your carved roast on a warmed platter, arranging slices slightly overlapping to showcase the perfect pink interior. Drizzle any accumulated juices over the meat for added moisture and visual appeal.
Your Next Culinary Adventure Awaits
Mastering how to cook strip loin roast perfectly transforms you from a nervous cook into a confident chef. Each time you follow these five proven steps, you’ll build the intuition needed to create consistently exceptional results.
The techniques you’ve learned here apply to many other roasts, giving you the foundation for countless future culinary successes. Start planning your next dinner party – your guests will be talking about this roast long after the evening ends.
Ready to impress your family and friends? Gather your ingredients, set aside adequate time, and trust the process. Your journey to roast mastery begins with that first perfectly golden, aromatic strip loin roast emerging from your oven.
