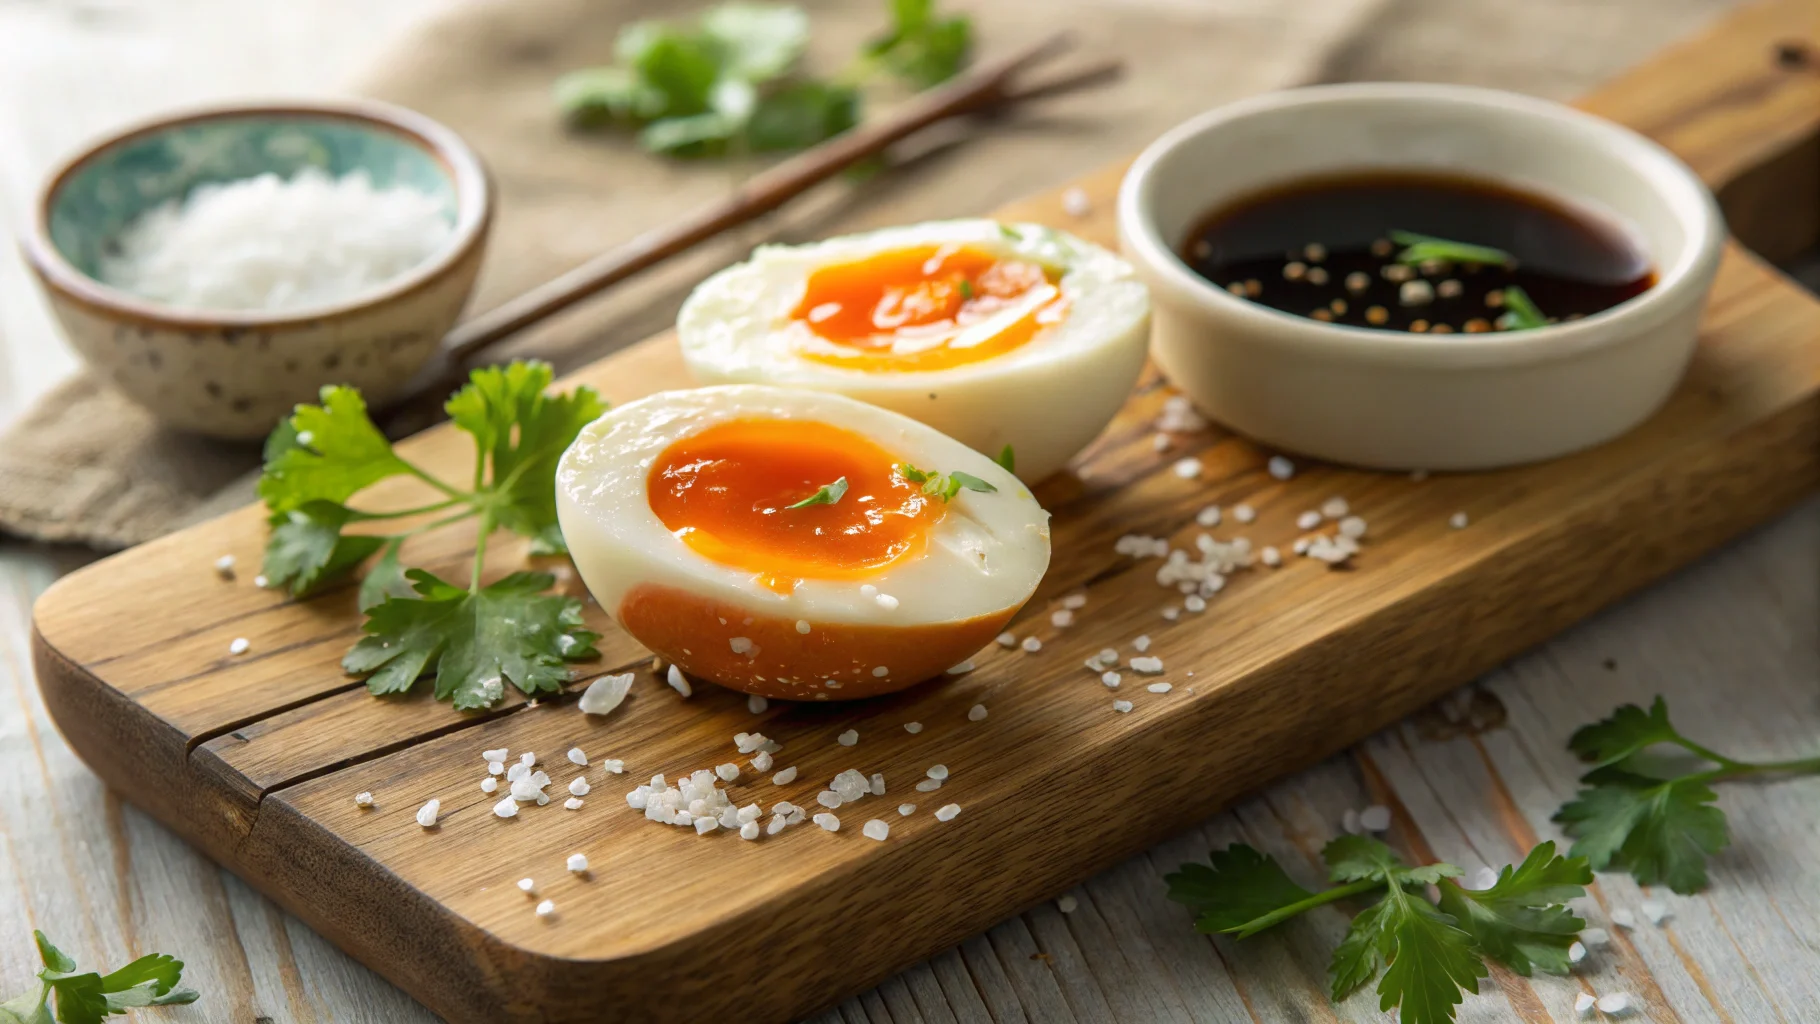
Have you ever bitten into an egg with a perfectly set white and a gloriously gooey, sunset-orange center that slowly cascades onto your plate? That moment changed everything for me. After countless breakfast experiments and many dozens of eggs later, I discovered the exact technique for achieving those elusive jammy eggs consistently.
The beauty lies in that perfect middle ground between hard-boiled firmness and soft-boiled runniness – a luscious, spreadable yolk that transforms ordinary meals into memorable ones. What’s more remarkable? You can master this culinary feat in exactly six minutes.
Forget inconsistent results and disappointing chalky yolks. This guide will equip you with the precise method and insider tips that guarantee perfect jammy eggs every single time, elevating everything from your morning toast to your evening ramen bowl.
The Science Behind Perfect Jammy Eggs
Understanding why jammy eggs behave the way they do helps ensure consistent results. When subjected to heat, the proteins in egg whites coagulate at approximately 180°F, while yolk proteins begin transforming around 158°F. This temperature difference explains why achieving that perfect jammy consistency requires precision – you’re aiming for fully set whites while keeping yolks in that magical semi-solid state.
Timing becomes absolutely crucial here. Just 30 seconds too long can push your yolks past that jammy stage into firmer territory. Conversely, 30 seconds too little might leave whites slightly underset while yolks remain too runny.
The immediate ice bath after cooking serves a vital purpose beyond making eggs easier to handle. This rapid temperature drop halts the cooking process decisively, preventing residual heat from continuing to solidify those precious yolks. Without this crucial step, carryover cooking would push your perfectly jammy eggs toward hard-boiled territory, even after removing them from hot water.
What You’ll Need: Essential Tools for Jammy Egg Success
Before diving into the cooking process, gather these key tools for optimal results:
Equipment Table
| Equipment | Why It’s Important |
|---|---|
| Medium saucepan | Provides adequate circulation space without crowding eggs |
| Timer or stopwatch | Essential for hitting the precise 6-minute mark |
| Slotted spoon | Enables gentle handling when transferring eggs |
| Large bowl for ice bath | Ensures rapid temperature drop to halt cooking |
| Ice cubes | Critical for immediate cooling |
Ingredients Table
| Ingredients | Amount | Notes |
|---|---|---|
| Eggs | As many as needed | Room temperature yields more consistent results |
| Water | Enough to cover eggs by 1 inch | Filtered water prevents mineral off-flavors |
| Ice | 2 cups | More is better than less for proper cooling |
| Salt (optional) | 1 tablespoon | May assist with peeling but not essential |
The 6-Minute Jammy Egg Method: Step-by-Step Guide
Preparation (2 minutes before cooking)
Allow your eggs to warm slightly by removing them from refrigeration about 20 minutes before cooking. This reduces the temperature shock when eggs enter boiling water, decreasing the likelihood of cracks. Cold eggs straight from the refrigerator often crack when introduced to boiling water, ruining your jammy egg aspirations before they begin.
Prepare your ice bath while water comes to a boil. Fill a large bowl halfway with ice, then add cold water until the ice just begins to float. Having this ready ensures you can transfer eggs immediately after cooking without wasting precious seconds.
The Perfect Boil (1 minute)
Bring your water to a true rolling boil before adding eggs. Gentle simmers won’t provide the consistent heat needed for precise cooking. The water should bubble vigorously across the entire surface.
Contrary to popular methods suggesting starting eggs in cold water, beginning with already-boiling water gives you greater control over cooking time. Cold-start methods make timing unpredictable as water heating rates vary between stoves.
While some chefs swear by adding salt or vinegar to boiling water, testing reveals this has minimal impact on jammy egg results. Save these additions for poached eggs instead.
The Gentle Egg Entry (30 seconds)
Carefully lower each egg into boiling water using your slotted spoon. Avoid simply dropping them in, as this increases breakage risk. Instead, partially submerge each egg with your spoon before gently releasing it.
For multiple eggs, work quickly but carefully, aiming to add all eggs within 15-20 seconds. This ensures relatively consistent cooking times among all eggs.
Once eggs enter the water, you may notice the boil subsiding briefly. This is normal – maintain heat but avoid turning it higher to compensate, as aggressive boiling increases the chance of cracking.
The Critical 6-Minute Cook (6 minutes)
Start your timer immediately after the last egg enters the water. Maintain a gentle but consistent simmer throughout cooking – not a rolling boil, which may cause eggs to bounce and crack, but definitely not a still pot either.
For standard large eggs, exactly 6 minutes produces the quintessential jammy consistency. However, egg size matters significantly:
- Medium eggs: Reduce to 5:30 for comparable jamminess
- Extra-large eggs: Increase to 6:30 for similar results
- Jumbo eggs: May require up to 7 minutes
This cooking window demands your full attention – stepping away risks missing the perfect moment. Even 30 seconds of distraction can transform your jammy masterpieces into ordinary hard-boiled eggs.
The Essential Ice Bath (2 minutes)
The moment your timer signals 6 minutes, act swiftly. Using your slotted spoon, transfer eggs immediately into your prepared ice bath. Ensure they’re fully submerged, adding more ice if necessary.
Keep eggs in the ice bath for a minimum of 2 minutes. This step isn’t optional – skipping or shortening it virtually guarantees overcooked eggs as residual heat continues cooking them from within. The ice bath also contracts the egg slightly inside its shell, creating a small air gap that significantly improves peelability.
The Peeling Process (1-2 minutes)
After their ice bath, eggs are ready for peeling. The tap-and-roll method works wonderfully: gently tap the wider end of the egg on a hard surface, then roll the egg under light palm pressure to create a network of small cracks throughout the shell.
Begin peeling from the wider end, where the air pocket creates a natural starting point. If you encounter stubborn shells, try peeling under a gentle stream of cool running water, which helps separate membrane from egg white.
For particularly difficult eggs, try cracking the shell all over, then soaking in cool water for 30 seconds before attempting to peel again. The water often seeps between shell and egg, loosening the connection.
Serving Your Perfect Jammy Eggs: Ideas and Inspiration
For maximum visual impact, slice jammy eggs with a sharp knife – dull blades drag through the yolk, smearing that beautiful jammy texture. Wiping your knife between cuts ensures clean, Instagram-worthy presentation.
Freshly cut jammy eggs benefit enormously from a light seasoning. Flaky sea salt accentuates their rich flavor, while freshly cracked black pepper adds welcome complexity. For elevated presentations, consider a sprinkle of za’atar, togarashi, or smoked paprika.
While best enjoyed fresh, properly cooled jammy eggs can be stored in the refrigerator, unpeeled, for up to three days. Their texture gradually firms over time, so for maintaining maximum jamminess, consume within 24 hours.
Elevate Your Meals: 10 Delicious Ways to Use Jammy Eggs
- Ramen Enhancement: Halve a jammy egg and float it in your favorite ramen, letting the yolk create a luscious broth enrichment.
- Avocado Toast Revolution: Layer thin avocado slices on grainy toast, top with a jammy egg, and finish with flaky salt and red pepper flakes.
- Grain Bowl Protein: Add quartered jammy eggs to quinoa or farro bowls with roasted veggies for a protein boost that’s more interesting than plain chicken.
- Salad Transformer: Nestle halved jammy eggs into green salads – they pair particularly well with bitter greens and vinaigrette.
- Standalone Snack: Enjoy them simply with a sprinkle of everything bagel seasoning as a satisfying protein-rich snack.
- Sandwich Elevation: Layer into breakfast sandwiches instead of fried eggs for less mess and more flavor concentration.
- Egg & Soldiers Reimagined: Serve with buttered toast strips for dipping into that perfect jammy center.
- Buddha Bowl Component: Create colorful veggie-forward bowls with jammy eggs as the crowning protein element.
- Shakshuka Addition: Nestle pre-made jammy eggs into warm shakshuka just before serving instead of poaching eggs directly in the sauce.
- Breakfast Bowl Base: Build morning grain bowls with jammy eggs as the centerpiece, surrounded by fresh and roasted vegetables.
Troubleshooting: Common Jammy Egg Problems Solved
Green ring around yolk: This harmless but unappealing sulfur compound forms when eggs overcook. Prevent it by strictly adhering to timing and using the ice bath without fail.
Eggs cracking during cooking: Allow eggs to warm slightly before cooking and lower them gently into the water. Extreme temperature changes cause most cracks.
Difficult-to-peel eggs: Very fresh eggs naturally cling to their shells more tenaciously. Using slightly older eggs (7-10 days old) and ensuring a proper ice bath helps significantly.
Inconsistent results: Variables like egg starting temperature, water-to-egg ratio, and precise timing all impact results. Standardize your approach by using eggs from the same section of your refrigerator and maintaining consistent water volume.
Undercooked whites: If whites remain translucent or goopy while yolks are perfect, your water likely wasn’t hot enough throughout cooking. Maintain a consistent simmer rather than a bare shimmer.
Nutritional Benefits of Perfectly Cooked Eggs
Jammy eggs offer nutritional advantages over their hard-boiled counterparts. Research suggests that proteins in less-cooked yolks maintain higher bioavailability, while beneficial compounds like lutein and zeaxanthin remain more intact.
A standard large jammy egg provides approximately 72 calories, 6 grams of protein, 5 grams of healthy fats, and significant amounts of vitamins B12, D, and choline – nutrients essential for brain health, energy production, and cellular function.
The semi-soft cooking method preserves the natural lecithin in egg yolks, a compound that helps emulsify and digest fats while supporting liver function. This makes jammy eggs not just delicious but genuinely nourishing.
Perfect Your Jammy Egg Technique
Mastering the 6-minute jammy egg transforms a humble ingredient into a culinary achievement that’s both impressive and accessible. The balance of technique and timing creates that signature contrast between firm whites and lusciously soft yolks that elevate everything they touch.
With these precise steps and a little practice, you’ll never struggle with inconsistent results again. Whether crowning your avocado toast or floating in savory ramen, these perfect jammy eggs add protein, nutrition, and undeniable appeal to countless dishes.
Why not elevate your breakfast tomorrow with these perfect jammy eggs? Your morning routine deserves this small yet significant upgrade. Share your jammy egg creations or questions in the comments below – I’d love to see how this technique transforms your meals!
FAQ: Everything You Need to Know About Making Perfect Jammy Eggs
Q: Can I make perfect jammy eggs in advance for meal prep? A: Yes! You can prepare jammy eggs up to 3 days ahead when stored unpeeled in the refrigerator. The yolks will gradually firm up over time, so they’re jammiest when consumed within 24 hours.
Q: What’s the difference between soft-boiled eggs and jammy eggs? A: While soft-boiled eggs feature liquid, runny yolks, jammy eggs have that signature gel-like, spreadable consistency – firmer than runny but softer than hard-boiled. Think of it as the perfect middle ground.
Q: Do I need to use fresh eggs to make perfect jammy eggs? A: Surprisingly, eggs that are 7-10 days old often work better as they’re easier to peel. Very fresh eggs tend to cling stubbornly to their membranes, making clean peeling challenging.
Q: My jammy eggs are always difficult to peel. How can I make perfect jammy eggs that peel easily? A: The ice bath is crucial for easy peeling. Ensure eggs spend at least 2 minutes fully submerged in ice water before attempting to peel. Starting from the wider end and peeling under running water also helps significantly.
Q: How do I adjust the cooking time if I want my perfect jammy eggs slightly firmer or runnier? A: For slightly firmer yolks, add 30-45 seconds to your cooking time. For runnier centers, reduce cooking by 30 seconds. Remember that even minor adjustments significantly impact the final texture.
Q: Can this perfect jammy eggs method work at high altitude? A: Yes, but you’ll need to extend cooking time by approximately 1 minute when making perfect jammy eggs above 3,000 feet elevation since water boils at lower temperatures at higher altitudes.
